Quick Start
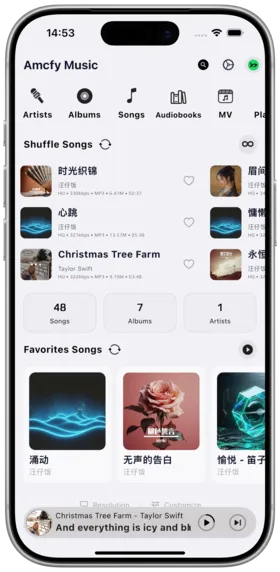
Installation
iOS
- Open App Store, search for "Amcfy Music"
- Tap download and install
- Grant necessary network permissions on first launch
System Requirements
iOS 14.0 or later
Android
- Open Google Play Store (or Huawei/Xiaomi/OPPO/vivo app store)
- Search for "Amcfy Music"
- Tap install
- Grant storage and network permissions on first launch
System Requirements
Android 7.0 or later
Desktop
Supports macOS, Windows, Linux desktop versions. Visit Download Page to download.
- macOS: Download
.dmgfile, drag to Applications folder - Windows: Download
.zippackage, extract and run - Linux: Download
.deb/.rpm/.tar.gzpackage to install
Step 1: Prepare Server
Before using Amcfy Music, you need a running music server. Here are recommended quick setup options:
🥇 Top Recommendation: Daoliyu Music
Daoliyu Music is Amcfy Music's official partner, offering deep integration and one-click Docker deployment — the recommended first choice.
- 🌐 Official Site: https://daoliyu.cn/
- 📦 One-click Docker deployment
docker run -d \
  --name daoliyu \
  -p 65001:65001 \
  -v /your/music:/music \
  daoliyu/music:latest
Tips
See Daoliyu official docs for detailed deployment tutorials.
🥈 Open-Source Pick: Navidrome
Navidrome is one of the most popular open-source music servers — lightweight, efficient, and community-driven.
- 🐙 GitHub: https://github.com/navidrome/navidrome
docker run -d -p 4533:4533 -v /music:/music deluan/navidromeOther Open-Source Options
| Server | GitHub | Docs | Best For |
|---|---|---|---|
| Jellyfin | jellyfin/jellyfin | jellyfin.org | All-in-one media management with video and music |
| Gonic | sentriz/gonic | See project README | Lightweight Go implementation, ideal for Raspberry Pi |
| LMS | epoupon/lms | See project README | Minimalist music server, extremely low resource usage |
| qm-music | chenqimiao/qm-music | See project docs | Lightweight music management backend |
| music-tag-web | xhongc/music-tag-web | See project docs | Music tag management and editing platform |
| Audiobookshelf | advplyr/audiobookshelf | audiobookshelf.org | Designed for audiobooks and podcasts |
How to Use:
- Deploy any of the above servers on NAS, VPS, or local computer
- Place your music files in the server's designated music directory
- Confirm the server is running properly, note the server address and port
Notes:
- Ensure the server and your device are on the same network (LAN), or the server is configured for public access
- Some servers require initial setup (create admin account, scan music library, etc.)
- Firewall must allow the corresponding port
Use Cases:
- Home Music Center: Deploy Navidrome on NAS for family-wide music sharing
- Personal Cloud Music: Deploy on VPS for music access anywhere
- In-Car Music: Use with CarPlay/Android Auto
Step 2: Add Server Connection
Method 1: Manual Setup
- Open Amcfy Music app
- Go to Settings → tap Add Connection (+ button)
- Select server type (e.g., Subsonic, Navidrome, Jellyfin, etc.)
- Enter the following information:
- Server Address: e.g.,
http://192.168.1.100:4533(LAN) orhttps://music.example.com(WAN) - Username: Server login account
- Password: Server login password
- Server Address: e.g.,
- Tap Login to test the connection
- Once connected, the app will automatically load your music library
Method 2: Scan Share Link
If a friend has shared an Amcfy Music connection:
- Open app → Settings
- Tap Scan QR Code
- Scan the shared QR code to automatically add the connection
Method 3: Demo Server
To quickly try the app, connect to the official Demo server:
- Built-in Demo server option, no configuration needed to experience basic features
Notes:
- Server address format:
protocol://address:port(e.g.,http://192.168.1.100:4533) - For HTTPS with self-signed certificates, enable "Ignore Certificate Verification" in settings
- IPv6 address direct connection supported
- Server 301/302/307/308 redirects supported
How to Use:
- LAN address format:
http://192.168.x.x:port - WAN address format:
https://your-domain.com - IPv6 addresses use bracket format:
http://[2001:db8::1]:4533
Step 3: Personalize
After connecting, you can customize:
- Homepage Customization: Tap "Customize Homepage" at the bottom of the homepage
- Navigation Customization: In navigation bar, last item "Settings" to customize menu
- Theme: Settings → Theme, choose Dark/Light/System, with manual theme color switch
- Language: Settings → Language, supports 14 languages (English, 简体中文, 日本語, etc.)
Quick Feature Index
| Feature | Entry Point | Shortcut |
|---|---|---|
| Play/Pause | Mini player / Full screen player | Headphone button |
| Search | Navigation bar search icon | - |
| Offline Download | Song/Album right menu → Download | - |
| Lyrics | Full screen player display | - |
| Equalizer | Full screen player → Audio Effects | - |
| Listening Report | Navigation "My" → Report | - |
| Favorites | Song/Album/Artist detail page heart button | - |
Video Tutorial
Tips
For more tutorials, visit the Official Website
Copyright
License under:Attribution 4.0 International (CC-BY-4.0)